
How to manually eject a stuck PS4 disc

You can encounter all kinds of problems when gaming on any console – from the frighteningly complex to the downright silly. Having your game disc stuck in a PS4 and not knowing how to get it out is one of the latter. This is why we want to give you a short walkthrough of how to eject a stuck PS4 disc.
The standard ways to eject a PS4 disc
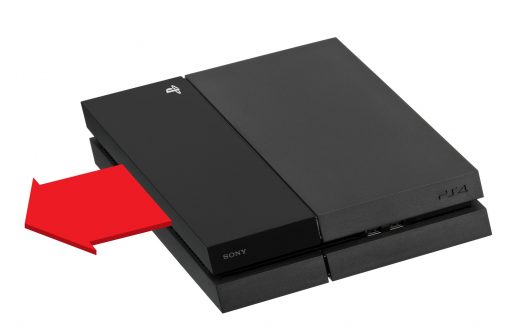
Before we go onto opening cases and swinging screwdrivers, you should know that there are two simpler ways to eject a disc – the microscopic eject button on the front of your PS4 and an option in your games list.
The PS4 power and eject button are notoriously small, with even experienced gaming journalists like Polygon’s Ben Kuchera having been understandably confused for the longest time as to what they do and that they even existed. Below is a picture showing exactly where it is and how it looks like.

You can also choose the game in your games list, press the Options button on your controller and choose the Remove Disc option and eject it that way.
The manual way to eject a stuck PS4 disc
Basics aside, you’re probably here because the previous options didn’t work or you’ve had an even bigger error-filled calamity that got your PS4 disc stuck. You will need a narrow, medium-length Phillips screwdriver to turn a couple of screws (Phillips screwdrivers have a cross pattern on the end of it).
To fix a stuck PS4 disc you first have to know what number the model it is since the methods are different. Your PS4’s model number should be on a label either next to the PS4 logo or next to cable ports.
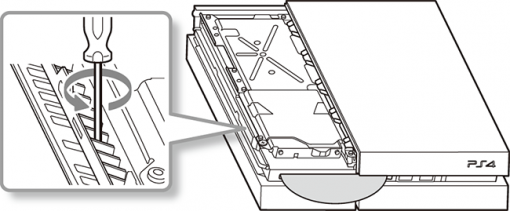
Removing a stuck disk from PS4 CUH-2015, CUH-7010, and CUH-2015 series
- Turn off the console and remove all cables from it (HDMI, power cables)
- Place the console upside-down on a flat surface and locate a screw hole directly above the PlayStation logo, if there’s a cap on the hole, remove it
- Insert the screwdriver into the hole and turn the screw counter-clockwise to eject the disc
- Once the disc has been removed you can plug your console back in and turn it on.
Removing a stuck disk from PS4 CUH-1000 and CUH-1110 series
- Turn off the console and remove all cables from it (HDMI, power cables)
- Pull off the internal hard drive cover
- You should see a row of vents on the outer side of the console now. Locate the first vent hole that isn’t bunched up with other vent holes
- Insert the screwdriver into this hole and turn the screw counter-clockwise to eject the disc. You may need to shine some light into the hole to find the screw
- Once the disc starts coming out of the console, remove it by hand, after which you can put the console back together, plug all the cables back in and turn it on.
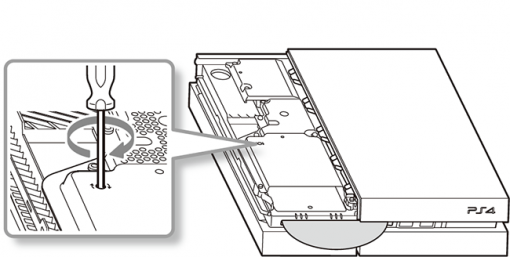
Removing a stuck disk from PS4 CUH-1200 series
- Turn off the console and remove all cables from it (HDMI, power cables)
- Pull off the internal hard drive cover
- Locate the small screw that is keeping the hard drive in place and unscrew it
- Remove the hard drive so that you can insert the screwdriver through the hole located on the top of the hard drive housing
- Turn the screw at the bottom of the hole counter-clockwise to eject the disc
- Once the disc is removed you can put the console back together, plug all the cables back in and turn it on.
You don’t have to screw back any of the screws as they don’t hold anything together. We hope that you found our short walkthrough helpful and will check out more of our PS4-related articles.


![DRIVER_POWER_STATE_FAILURE error on Windows [FIX]](https://hddmag.com/wp-content/uploads/2017/07/BSOD-768x432.jpg)